
Our weather has fluctuated wildly from beastly hot to unseasonably cool and humid, and today, very hot and humid. It leaves me feeling as if I wish we didn’t need to eat so I wouldn’t have to shop and cook! There’s been a lot of straining going on in my kitchen lately…of the consumable kind. I have two simple recipes that have sparked my days a bit, and the only thing they have in common is both require straining. The preparations are much simpler than my explanations below will indicate, I just want to give you some background on things.
Have you heard of ‘cold brew’ coffee? I have been hearing about it, and even drinking it, when in Adelaide, for about a year. I hadn’t taken the trouble of finding out the process but loving coffee as I do, and almost never being able to get a decaffeinated iced coffee, I thought I would investigate.

Descriptions of the process were simple and almost identical except for the equipment they wanted to sell to make it. I just don’t want anything else to have to store in my kitchen. So, I experimented with the coffee grinder that I already have, a recycled jar and my beloved coffee cone. Presto! I have really delicious decaffeinated iced coffee whenever I want it (minus the whipped cream used to style the coffee for the photo!). For the most part, I use good quality, water processed, decaffeinated beans, but I have made the cold brew with both regular and decaf beans and it works the same. I’m sure you could also brew it with already ground coffee, but as with hot brewed coffee, freshly ground tastes better.
I only make enough to last me a few days at a time because it is easy to make, but because it is low acid, apparently it keeps for a couple of weeks in the refrigerator if you want to make a larger batch. Most of the instructions I read called for keeping the ratio of coffee to water at about 1:8. The strength I am happiest with is slightly stronger than that, allowing for the milk which dilutes the strength, so you can adjust it to suit your own tastes. You may not like milk in your iced coffee at all OR you can also have nut milk in it. I also have cashew milk sometimes and that is delicious too.


1/4 C coffee beans (decaffeinated or otherwise), ground on course grind, as for French Press
2 C bottled or other preferable water. I use bottled because Alice Springs water has a lot of minerals in it and doesn’t make coffee or tea taste as nicely as bottled water.
Method:
• Grind 1/4C coffee beans (which amounts to more than 1/4C of grounds if you decide to use pre-ground coffee)
• Put into jar
• Add 2 C water of choice (not heated, just room temp is fine)
• Stir grounds so that everything is wet
• Screw lid onto jar
• Soak for 24 hours, either at room temperature or in the fridge
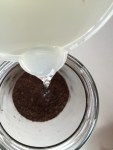
• Pour brewed coffee into coffee filter placed in a cone or strainer or other receptacle placed over a bowl or jug or jar
• Pour strained coffee into jar and store in fridge for up to two weeks.
How easy is that? Grind, soak, strain, drink.
As promised, here is the ricotta recipe I have recently made. I need to preface this with a cautionary note about the varieties of cream and milk one uses for this and the accordingly varying results. Recently I couldn’t find my normal cream so I used a Tasmanian double cream and the ricotta came out very dry. This wasn’t a problem for me, I just added some good organic plain yogurt to it to use it, but it may not be your preference. I think the cream is the reason this doesn’t go ‘rubbery’ like other ricotta recipes I’ve tried, but I could be wrong. I’m no expert so let me know how you go with it.
8 C (4 C) whole milk (the best you can find, I like bio-dynamic or organic)
1 C (1/2 C) heavy cream (the best you can find, but NOT thickened)
1 1/2 tsp (3/4 tsp) sea salt
3 T (1.5 T) lemon juice
two layers of cheesecloth
large bowl
colander

Pour milk and heavy cream into a 5- to 6-quart pot, along with 1 1/2 teaspoons of sea salt.
Squeeze 3 tablespoons of lemon juice into a small bowl and set aside.
Line a colander with two layers of cheesecloth, and set over a large bowl.
1) With the burner on medium high, heat the mixture, stirring occasionally to avoid scorching, until it foams and just comes to a boil. Watch the pan like a hawk because milk will froth, boil and then heave itself up over the sides of the pan so fast it will make your head spin. Just stand there and watch it and as soon as it foams and starts to heave, turn the heat down to low, sooner if you are cooking with electric.
2) As soon as the heat is on low, add the lemon juice. The citric acid in the lemon juice will help the milk solids curdle.

3) Let the mixture simmer, stirring gently, until it forms small bits of cheese (the curds). It will take about 2 minutes for small curds to form. If you’d like your ricotta to be drier with larger curds, let it simmer for 2 minutes more. I simmer for 2 minutes only, because I like a moist, small curd that can be spread on toast or mixed with yogurt on fruit or cereal.
4) Carefully pour the mixture into your prepared colander that you have set over the large bowl to strain the curds.

5) The original recipe said to let the mixture drain for 7-10 minutes or until the ricotta is how you like it—whether that’s tender and spreadable or firm and dry. The longer you let it drain, the thicker the ricotta will be. For the same reasons as above, I only let mine drain for 5 minutes.


The ricotta will keep in the fridge for 1 week, though you’ll probably finish it long before then, if you have help eating it. I am the only one in my house who eats it so I make half a recipe (in parenthesis above) and it works beautifully. I think it is the cream and the short cooking/draining times that make this the consistency I like, but experiment with it for your own tastes. I’ve tried making regular, whole milk ricotta without the cream and I didn’t like it as much as this one, but each to our own tastes. You can also reserve a jar of the whey milk to use in other recipes. It is a little salty, however, so keep that in mind. Lately, I have been soaking chia seeds in a small amount of whey liquid and then adding yogurt and berries and seeds to it for breakfast. I have also read that the whey is good to add to creamy style soups, and to use as liquid in bread baking and in smoothies.
(for quick reference I have included recipes for the coffee, ricotta, cashew milk and pumpkin bars under the ‘Food’ menu on the head of this blog)


Leave a comment